


Express Entry Step by Step Process

Table of Contents
In this post, I will be sharing the Express Entry step by step process based on my personal experience and recent application under Canadian experience class. I will also share links to the official CIC website for further reading and clarity.
Check if you are eligibility
First step to check is to check if you are eligible. You may answer a simple questionnaire by going to the CIC website. Here is the link for quiz http://www.cic.gc.ca/ctc-vac/ee-start.asp
It might take 15 minutes to answer all the questions.
English Language Tests
If you are eligible for express entry, the next step is to get minimum Canadian Language Benchmark (CLB) 7 in each of the four sections. There are three categories under express entry – Federal Skilled Worker (FSW), Provincial Nomination Program (PNP) or Canadian Experience Class (CEC). Higher score in English language testing means a higher CLB score. 10 gives you maximum points for language. CLB 8 and higher is achievable for most applicants.
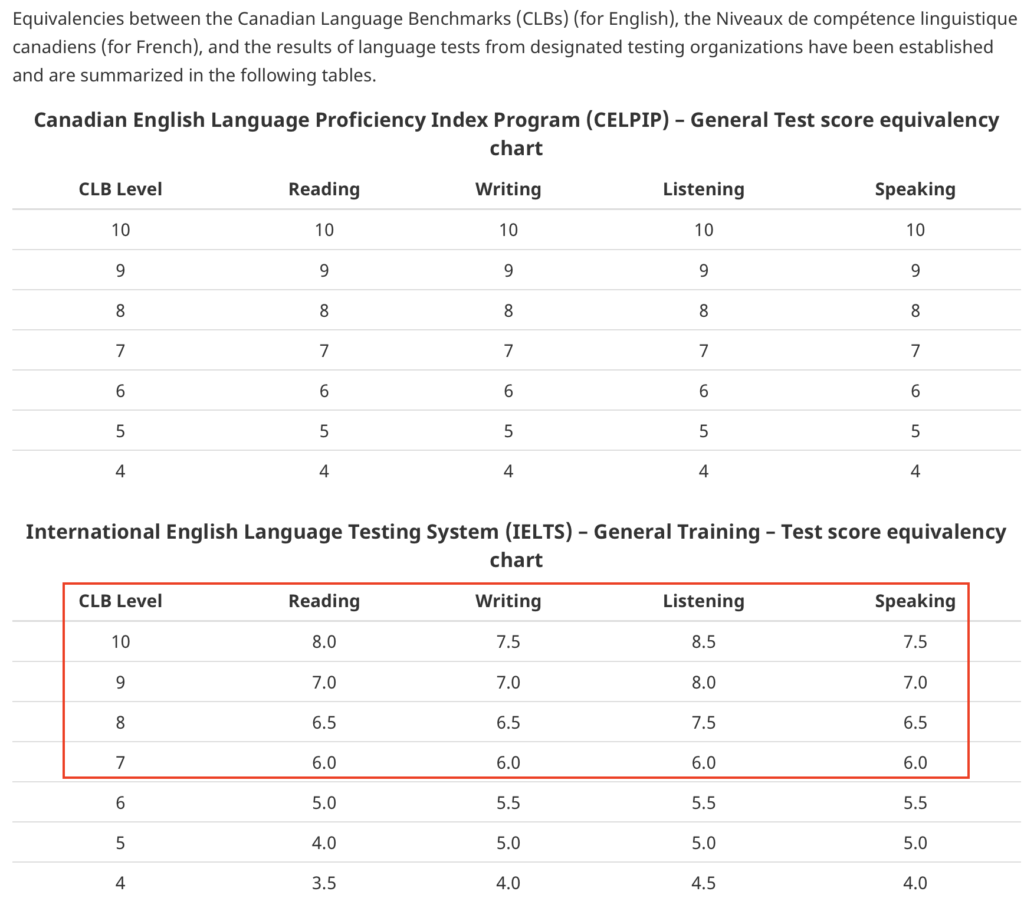
Table reference: http://www.cic.gc.ca/english/resources/tools/language/charts.asp
Qualifications assessment
While you are preparing for a language test, you could start an Education Credential Assessment (ECA) on the side. ECA usually takes 4 to 6 weeks. Find the more details on ECA on this link: http://www.cic.gc.ca/english/immigrate/skilled/assessment.asp
Get your NOC code
You might have worked for a number of roles in your country. Jobs are grouped based on the type of job duties and work a person does.
For immigration purposes, the main job groups are:
- Skill Type 0 (zero): management jobs, such as:
- restaurant managers
- mine managers
- shore captains (fishing)
- Skill Level A: professional jobs that usually call for a degree from a university, such as:
- doctors
- dentists
- architects
- Skill Level B: technical jobs and skilled trades that usually call for a college diploma or training as an apprentice, such as:
- chefs
- plumbers
- electricians
- Skill Level C: intermediate jobs that usually call for high school and/or job-specific training, such as:
- industrial butchers
- long-haul truck drivers
- food and beverage servers
- Skill Level D: labour jobs that usually give on-the-job training, such as:
- fruit pickers
- cleaning staff
- oil field workers
Your occupation must be NOC 0, A, or B for Federal Skilled Worker or Canadian Experience Class (CEC). To find out the best applies to you on the National Occupation Classification (NOC) based on your job title, please refer to details on http://www.cic.gc.ca/english/immigrate/skilled/noc.asp
Express entry profile
This is the most important step. Once the above steps are complete, next you are ready to create your express entry profile by going to http://www.cic.gc.ca/english/immigrate/skilled/profile.asp
Points will be based on your age, education, number of years work experience, and language skills. For more information on the points system, please refer to this link http://www.cic.gc.ca/english/express-entry/grid-crs.asp.
You will be in a pool with thousands of other applicants. Please check out http://www.cic.gc.ca/english/immigrate/skilled/pool.asp for more details on pools.
Invitation to apply (ITA) and next steps
CIC has a draw for express entry every month. If score is more or equivalent than draw cutover, you would receive an ITA to your registered email. Upon receipt of an Invitation to apply (ITA), a candidate has 60 calendar days to do one of the following:
- Submit a complete application for permanent residence (APR) in their online account. This includes providing all supporting documentation up front.
Fees and documents required after ITA
Fees
For your application: $1,325 [ Processing fee ($825) and right of permanent residence fee ($500) ]
Include your spouse: $1,325
Include a dependent child: $225
Proof of Funds
Identify how you will provide proof of funds http://www.cic.gc.ca/english/immigrate/skilled/funds.asp
Related post – http://immigrants101.com/proof-of-funds-letter-for-canada-immigration/
Police Certificates
All applicants have to upload police certificates. It is highly recommended to apply it ASAP to avoid delays. If you need more details on police certificates, check out this link – http://www.cic.gc.ca/English/information/security/police-cert/index.asp
Medical Exam
find out how long it takes to get a date for the medical exam. http://www.cic.gc.ca/english/information/medical/medexams-perm.asp
Job Letters
Contact previous and current employers about them providing job letters. You must have at least 12 months of full-time, or an equal amount of part-time, skilled work experience. Full-time work means at least 30 hours of paid work per week. Work experience while you were a full-time student does not count.
Processing time and CoPR
Most completed applications are processed within 6 months. Based on personal experience and research, express entry step by step process after ITA :
False IP2
Usually right from AOR or just after MEP. Background Check shows “We are processing your background check. We will send you a message if we need more information.”
MEP
Medicals passed: review of medical results changes from “You do not need a medical exam.” to “You have passed the medical exam.” There is no email for MEP.
Ghost Update
When you log in, the application says it has been “updated” but none of the fields have changed. I would recommend to logout and log back in, the application returns to being “submitted”.
Ghost Update #1 or Real IP1
“In progress” 1: Background Check changes to “Your application is in progress. We will send you a message when we start your background check.” Usually follows MEP. Some applicants (especially Inland and CEC) skip this stage.
NA2
“Not Applicable” 2: Background Check changes to “Not Applicable” again after IP1.
Ghost Update #2 or Real IP2
“In progress” 2: Background Check changes to “We are processing your background check. We will send you a message if we need more information.” No email.
NA3
“Not Applicable” 3: Background Check changes to “Not Applicable” again after IP2 (uncommon).
Ghost Update #3
Final Ghost Update – Often considered a sign that PPR is coming soon. Not seen by all applicants.
PPR request
Passport request: IRCC sends “Ready for visa” e-mail asking you to submit your documents to your visa office so they can issue your CoPR and entry visa if applicable. A PPR is announced only by email and there may be no changes made directly to the profile. It is recommended add email domain “@cic.gc.ca” to your allowlist ensure the email comes straight to your inbox.
CoPR
It is an acronym for Confirmation of Permanent Residence. It is an official document that confirm your application is approved for permanent residence.
Conclusion
The whole process from checking eligibility to get your permanent card delivered, it may take around 7 to 10 months. Please be patient and if you need an update on application, please feel free to lodge a webform on https://secure.cic.gc.ca/enquiries-renseignements/canada-case-cas-eng.aspx.
As always, thanks for reading the post on Express Entry Step by Step Process. Please feel free to comment if you have any questions or feedback about this post. Good luck with your application.


